Make foam insert for vintage board game by measuring box dimensions, selecting appropriate foam materials, cutting precise compartments, and assembling inserts to protect and organize game components effectively.
Make foam insert for vintage board game is one way to keep your old games safe and organized. Ever wondered how to protect delicate pieces and avoid box damage? This guide shares practical steps to build inserts that fit your classics snugly.
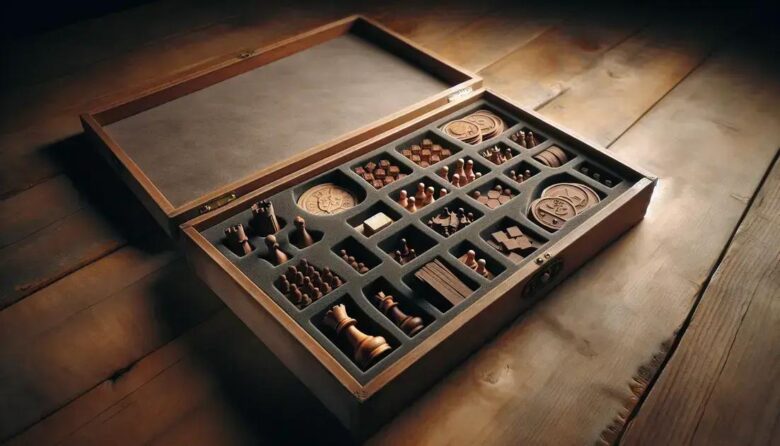
understanding the benefits of foam inserts for vintage games
Foam inserts provide excellent protection for vintage board games by securely holding each component in place. This prevents damage from shifts or impacts during storage and transport. The soft foam acts as a cushion, protecting delicate pieces like cards, miniatures, and boards from scratches and breaks.
Improved Organization
With foam inserts, every game element has its dedicated slot, making setup and cleanup faster and more efficient. No more searching through bags or boxes for missing pieces. This organized layout helps preserve the game’s integrity and enhances the playing experience.
Space Efficiency
Customized foam inserts optimize the use of available space inside the box. By fitting components snugly, inserts reduce wasted space, allowing vintage game boxes to close properly and stack neatly on shelves.
Overall, foam inserts extend the life of your vintage games while keeping them neat and ready for play. Investing time in creating tailored foam trays can be a game-changer for collectors and enthusiasts alike.
selecting the right materials for your foam insert
Choosing the right materials is crucial for making durable and effective foam inserts for your vintage board game. Start with high-quality foam that balances softness and firmness to protect components without crushing them.
Types of Foam
Polyethylene foam is popular for its rigidity and ability to hold shapes well, making it great for structural support. Polyurethane foam offers a softer, more cushioned feel, ideal for delicate pieces. Another option is EVA foam, which is flexible and easy to cut, suitable for custom inserts with complex shapes.
Consider Density and Thickness
Select foam density based on the weight and fragility of your game parts. Higher density foam provides better protection for heavy or sharp objects, while lower density works for lighter pieces. Thickness matters too—too thin won’t protect well, and too thick might cause the box to not close properly.
Other materials to consider include adhesive sprays for securing layers and cutting tools designed for foam, like electric knives or precision blades. Proper material choice ensures your insert lasts and keeps your vintage board game safe over time.
tools and supplies needed for DIY foam inserts
To create effective DIY foam inserts, having the right tools and supplies is essential. The first is a quality cutting tool. A sharp utility knife or an electric carving knife gives clean, precise cuts through foam. Using a straight edge or ruler helps guide cuts to stay accurate.
Essential Supplies
You’ll need sheets of foam, either polyethylene or polyurethane, depending on your project. Adhesive spray comes in handy for layering foam pieces securely. Markers or pencils make it easier to outline your design before cutting.
Additional Helpful Tools
A cutting mat protects your work surface and extends blade life. Small craft scissors can refine tight corners or tricky shapes. Measuring tape or a ruler ensures components fit perfectly within the insert. Finally, patience and steady hands make all the difference for neat results.
With these tools and supplies, you can create custom foam inserts that keep your vintage games safe and organized while improving setup time and durability.
measuring and planning the foam insert design

Measuring and planning your foam insert design is a key step to ensure a perfect fit for your vintage board game parts. Start by carefully measuring the interior dimensions of the game box. Use a ruler or measuring tape to record length, width, and depth to avoid surprises.
Mapping Out Component Placement
Next, organize your game pieces by size and shape. Lay them out on a flat surface in the order you want them stored. This visual arrangement helps identify how many compartments you need.
Creating a Template
Use graph paper or digital tools to sketch the layout, marking each slot’s dimensions based on your components. Leave extra space for easy removal and replacement of pieces. Remember to factor in foam thickness.
Accurate planning prevents wasted materials and reduces trial-and-error during cutting. Proper measuring guarantees that your foam insert will protect and organize your vintage game effectively.
step-by-step guide to cutting and assembling foam inserts
Start by carefully transferring your design measurements onto the foam sheet using a pencil or marker. Use a ruler to keep lines straight and precise. Cutting foam properly is essential for a clean fit.
Cutting the Foam
Use a sharp utility knife or electric carving knife to cut along the marked lines. Apply steady, even pressure and make multiple shallow passes instead of trying to cut through in one go. This prevents jagged edges and maintains foam integrity.
Assembling the Insert
If your insert has multiple layers or pieces, use a spray adhesive to bond them together. Spray a light, even coat on both surfaces, wait a few seconds, then press firmly together. Allow time to dry for a strong hold.
Test fit the foam insert inside your vintage game box before finalizing all cuts. Adjust edges or compartments as needed for a snug fit. Patience during this process ensures the perfect custom insert for your game pieces.
tips to customize inserts for unique game components
Many vintage board games include unique components like oddly shaped miniatures, dice trays, or special cards. Customizing foam inserts to fit these can improve protection and usability.
Using Layered Foam
Layering foam allows you to create different depths. Cut out slots in each layer to match the shape and height of the component. This technique works well for stacked pieces or uneven items.
Shaping Irregular Items
For oddly shaped pieces, use a sharp blade to carefully carve foam around the component. You can also press soft foam sheets around the item gently to mark the shape before cutting. This ensures a snug, secure fit.
Adding Labels or Color Coding
Consider using colored foam sheets or adding small labels to compartments. This helps identify parts quickly during setup. Colored foam can also add aesthetic value to your insert.
Flexible foam inserts that account for unique pieces make your vintage board game easier to store and play while guarding against damage over time.
maintaining and storing vintage games with foam inserts
Maintaining and storing vintage games properly extends their life and keeps them playable for years. Foam inserts play a key role in protecting your game components from damage and wear.
Proper Storage Conditions
Store your game boxes in a cool, dry place to avoid moisture damage. Excess humidity can cause foam to degrade and warp game pieces. Avoid direct sunlight, which can fade colors and weaken materials.
Cleaning and Care
Regularly dust the foam inserts using a soft brush or compressed air. If foam becomes dirty, gently spot clean with a damp cloth and mild soap. Avoid soaking foam as it can lose its shape and protective qualities.
Long-Term Protection
Using custom foam inserts keeps all components secure and prevents shifting that can cause scratches or breaks. When not in use, keep game components inside the foam to reduce risk of loss and maintain organization.
Consistent maintenance of foam inserts and storage conditions ensures your vintage board games stay in the best condition, ready for game night anytime.
Protect and preserve your vintage board games with DIY foam inserts
Creating custom foam inserts is a simple yet effective way to keep your vintage games safe and organized. With the right materials and tools, you can build inserts that fit perfectly and protect every piece from damage.
Careful measuring, cutting, and assembly ensure the inserts provide lasting support and convenience during gameplay. Regular maintenance and proper storage help your games stay in great condition for years to come.
By investing time in making foam inserts, you’ll enhance your gaming experience and protect your valuable collection. Start crafting today and enjoy hassle-free game nights with your beloved vintage games.