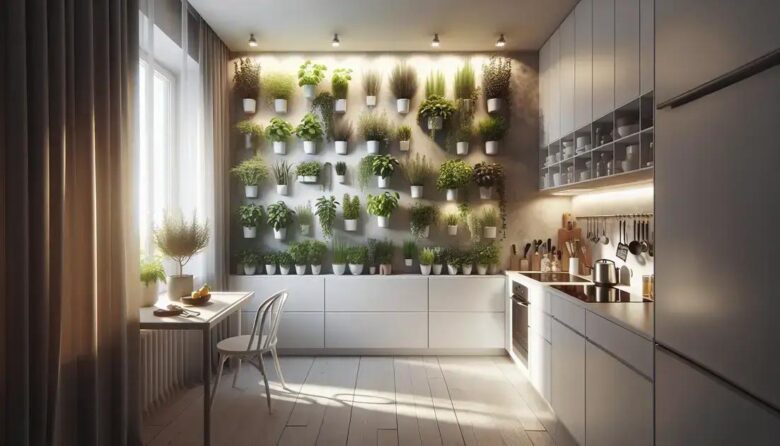
Creating a herb wall in a studio apartment kitchen involves selecting light-favored herbs like basil, using sturdy pots with good soil, and strategically positioning them to ensure optimal light and accessibility. Personalize with colorful pots and labels, maintaining the herbs with regular checks and appropriate lighting.
Imagine walking into your studio apartment kitchen and being greeted by a lush, aromatic herb wall. This little oasis not only saves space but adds a fresh touch to your cooking adventures. Curious to know how you can have one too?
choosing the right herbs for your wall
When setting up an herb wall, selecting the right herbs is a vital step. Consider your cooking habits and the sunlight available in your kitchen. Common choices are basil, parsley, and thyme, known for their versatility in various dishes. Evaluate the growth requirements and size of the herbs, ensuring they are suitable for your space. Ideally, choose herbs that thrive indoors and have similar light and water needs. Additionally, think about perennial herbs such as rosemary and sage, which provide ongoing value as they grow back each year, unlike annual herbs that last a single season.
best locations in small kitchens
Finding the best location for your herb wall in a small kitchen can be a game-changer for space optimization. Look for areas with adequate natural light, such as near a window or below a skylight. If sunlight is limited, consider supplementing with LED grow lights. The space above countertops or alongside open shelves offers convenient and accessible spots. Ensure the area is easy to reach for watering and harvesting. Avoid places near stoves or heat sources, as excessive heat can harm the herbs. By strategically choosing your herb wall’s location, you’ll create a functional and aesthetic addition to your kitchen.
essential tools and materials
Setting up a successful herb wall requires a few essential tools and materials. Begin with sturdy pots or containers, which can be mounted or free-standing. Use high-quality potting soil for optimal growth. Ensure you have a watering can or spray bottle for regular irrigation. Consider LED grow lights if your kitchen lacks natural sunlight. Wall mounts or shelves support your containers and should be chosen based on your kitchen space. Include labels to identify each herb easily. These tools and materials are crucial for creating an efficient and thriving herb wall.
step-by-step installation guide
Installing an herb wall in your kitchen involves a straightforward process. Begin by gathering your materials: pots, soil, a drill, and brackets. Step 1: Choose a location with ample light, ensuring the herbs will receive adequate sunlight. Step 2: Use the drill to securely attach the brackets to the wall. Make sure they are level for a neat appearance. Step 3: Fill the pots with high-quality potting soil, leaving some space at the top. Step 4: Plant your herbs, ensuring the roots are fully covered. Water them gently after planting. Step 5: Hang or place the pots on the brackets, arranging them for easy access. Step 6: Add finishing touches, like labels, to ensure you can easily identify each herb when needed.
maintenance tips for a thriving herb wall
Keeping your herb wall thriving requires regular maintenance. Watering is crucial—check the soil daily and ensure it stays moist but not waterlogged. Trim herbs regularly to promote growth and prevent them from becoming too leggy. Ensure adequate light by rotating plants or adjusting grow lights as the seasons change. Every few weeks, add a balanced fertilizer to support nutrient needs. Inspect plants for pests like aphids, and treat with organic remedies if needed. Re-pot herbs yearly to refresh the soil and provide space for roots to expand. Consistency in these tasks ensures a lush and vibrant herb wall year-round.
decorative ideas and personalization
Personalizing your herb wall can enhance both its aesthetic and functional appeal. Consider using colorful pots to match your kitchen decor. Add decorative labels that not only identify herbs but also add a touch of style. Incorporate small chalkboards or wooden signs for a rustic feel. Arrange herbs in patterns or shapes, like spirals or grids, to create visual interest. Incorporate artistic planters such as vintage tins or ceramic vases for a unique touch. You can also add small, decorative elements like miniature lights to highlight herbs at night. These creative ideas make your herb wall a distinctive feature in your home.
Wrapping Up: Creating Your Perfect Herb Wall
Building a herb wall in your studio apartment kitchen is both a practical and creative endeavor. By selecting the right herbs, choosing the best location, and gathering essential tools, you set the foundation for success.
Following the step-by-step installation guide ensures a seamless process, while regular maintenance keeps your herbs thriving. Adding personal touches through decorative ideas not only enhances beauty but also makes your herb wall a reflection of your style.
With consistent care and creativity, your herb wall will not only be functional but also a delightful centerpiece in your home.
So go ahead and transform your kitchen space into a lush paradise.
FAQ – Herb Wall Setup in Studio Apartments
What are the best herbs to grow indoors?
Basil, parsley, and thyme are popular choices for indoor herb walls due to their versatility and ease of growth.
How much light do herbs need?
Most herbs require at least 6 hours of sunlight per day. If natural light is insufficient, consider using LED grow lights.
What tools are essential for maintaining a herb wall?
You’ll need a watering can, pruning scissors, potting soil, and possibly LED grow lights for maintaining your herb wall.
How often should I water my herbs?
Check the soil daily. Water when the top inch feels dry to the touch, ensuring the soil remains moist but not waterlogged.
Can I grow herbs in low-light conditions?
Yes, with the help of LED grow lights, you can supplement natural light and successfully grow herbs in low-light environments.
How can I personalize my herb wall?
Use colorful pots, decorative labels, and artistic arrangements. Adding small elements like lights or chalkboards can enhance personalization.